If you are seeking a safe and efficient method to charge your RV battery, you’ve come to the right place for a solution. Our team of engineers will guide you on how to effectively charge your RV battery. Lithium RV batteries have gained immense popularity over traditional lead-acid batteries due to their high capacity and rechargeable nature. They offer numerous advantages, including efficiency, extended lifespan, eco-friendliness, and excellent discharge performance.

The primary electrolyte used in RV lithium batteries is a non-aqueous organic solvent, which plays a crucial role in their proper functioning. However, the battery’s overall performance is also contingent on the charging process. Ensuring that the RV batteries are charged correctly is vital for their effective operation. In this article, we will explore various safe and effective methods to charge RV batteries, empowering you to hit the road and embark on your adventures with confidence.

While the optimal way to charge a battery in a vehicle is usually by running the vehicle itself, certain situations may require charging the batteries separately in advance or using alternative methods. We’ll discuss these approaches, equipping you with the knowledge to charge your RV batteries safely and effectively, ensuring you’re always prepared for your next journey without any concerns.

RV Battery Basics for Newbies

Before you determine how to charge RV batteries, know what type of batteries you have in your RV. RV batteries, as a general rule, come in three different standard types.

The Different Kinds of RV Batteries Include:

  • Lead acid: Most flooded lead acid batteries have little caps you pop off to refill with distilled water (to minimize adding impurities).
  • AGM: This stands for “Absorbent Glass Mat”, which has to do with the construction of the battery. These are sealed, maintenance-free, and won’t spill. (They can also contain a gel-based substance, too.)
  • Lithium: These are also known as LiFePO4, or Lithium Iron Phosphate batteries. While usually the best choice, they do have their disadvantages too.

Aalmost all RVs are designed as 12V systems. The combination of batteries, whether wired in series or parallel, will output 12V. There are exceptions, however.

RV Lithium Battery Charger Types

When choosing the charger type to charge your RV lithium battery, you have various choices. Following chargers consider best to charge these batteries.

1. Converter Charger

Converter chargers, also termed AC chargers work by converting the alternating current into direct current. AC charger, just like a car battery charger, is a 120V to 12V converter. The converter charger cannot invert the charger as it only converts it.

Charging RV batteries with a converter charger is an automatic procedure. You can do it simply by plugging the RVs power cord into a 120V AC electrical outlet, and the charging process will start. It can convert the AC power to DC power to make charging more efficient and fast.

12-volt batteries can charge with an external battery charger. The external charger can decrease the charging time depending on its model either it decreases less time or more time. It is more suitable to charge a lithium RV batttery using a high amperage battery charger. It can prove faster and more effective to charge your RV battery.

2. Inverter Chargers

Inverter chargers act as both inverters and chargers. These chargers can effectively invert 12-volt DC power to 120-volt AC power. So, by using your RV battery bank, you can safely power electrical devices in your RV that require AC power. The inverter charger allows power to be switched between charging and discharging the battery. So one device can meet the usage needs of the RV.

3. Solar RV Battery Charge Controller

Solar ARV battery charge controller works by regulating the power that comes from the solar panels into the battery bank. The solar panel can locate on the RV roof. The overcharging of the battery can regulate by the regulator. Some RVs don’t have a solar charging setup, so you require some initial setup to set a solar system such as wires, solar panel and solar charge controller( to regulate voltage). All essential solar panel accessories are available in a solar panel system kit. You can purchase it from a certified company.

4. Multi Battery Chargers

Whenever there is a need to use multiple batteries, all these batteries can install as a single large bank in parallel or series. In this case, the multi-battery chargers can use to charge the multiple batteries effectively. If the batteries connect to the various systems, you may need multiple chargers to charge multiple batteries.

Ways to Charge an RV Battery

First of all, there are a few different ways to charge an RV battery. Some methods are faster than others.

Here are four safe and effective ways to charge:

  • Shore power
  • Generator
  • Motorhome or tow vehicle alternator
  • Solar energy

Next we’ll discuss how to charge your RV battery using each method above. The information below is for 12V deep cycle RV house batteries. (Or an equivalent, such as 6V batteries wired together).

Shore power

You can charge your deep cycle RV battery using electricity from the grid. There are two ways to do this. The first is to plug your RV’s power cable into a 120V AC electrical outlet at a campground. Your vehicle should have a converter that changes AC power to DC power so that your batteries can charge.

Another way to charge via shore power is via a battery charger. Ideally you’ll want to get one that matches your battery type (lead acid, AGM, lithium) for optimum charging. Some lithium smart chargers can charge both lead acid, AGM and lithium batteries.

Always check for compatibility before you use a battery charger with your RV batteries. If you use the wrong charger, one of three things will happen. You’ll get a snail’s-pace charge, no charge at all, or the worst case scenario: you’ll damage your battery.What kind of battery charger do we recommend? If you’re using lithium batteries, your smartest option is a smart battery charger like this one. Your RV batteries will charge in practically no time.

Generator

Here’s another easy, albeit noisy, way to charge RV batteries: use a generator. Some RVs have them onboard. You can also buy a portable one.

If your generator has a 120V outlet, simply plug your RV’s power cable in the way you would for shore power. If it has a 220V outlet, you’ll need a convertor. Be sure to follow safety precautions as indicated in the generator’s instruction manual, like checking the fuel levels and air filter.

Vehicle Alternator

Another option is to literally charge your RV batteries while on the road. But don’t expect a lightning-fast charge! When you use your towing vehicle (like a truck) and an alternator to charge the batteries, your batteries only get a bit of a boost. If you’re looking for more than just a bit, you’ll need to amp things up by adding a charger.

Solar Power

What’s the greenest way to charge an RV battery? Solar power! Unfortunately, you can’t just pop your battery out in the sun and hope it will soak up the energy like a leaf.

Do I Have to Buy a Specific Charger for LiFePO4 Batteries?

No, there is no need to buy a special charger to charge your LiFePO4 batteries. If you have to charge a LiFePO4 battery with a voltage of 12V, you can use a charger with 14V to 14.6V.

The charger within this voltage range can effectively charge your LiFePO4 battery. But, it does not mean that you use a charger used to charge other lithium batteries.

Such chargers have a voltage higher than the voltage of the chargers designed to charge LiFePO4 batteries. So, it can affect your battery charging. The most recommended chargers for the LiFePO4 batteries consider LiFePO4 battery chargers, which effectively and safely charge the batteries.

What Chargers Does Lithium Battery Support?

The recommended charger for lithium batteries is less than ≤0.5C. Therefore for a 12V100Ah battery, it recommends using a charger ≤ 50A.

You should not exceed this charge rate as it can lead to a shortened battery cycle life. In an emergency, the battery can charge quicker if needed, but it needs to be within a reasonable temperature range. Most of our customers use 10A~20A chargers.

You use lithium batteries in numerous applications, so using the correct lithium battery and its charger is convenient. It would be best if you had a good idea of choosing the appropriate spec of charger that you are using for your lithium battery. To select the charger spec for your battery, you must have the following information.

  • Battery Voltage
  • Battery Amp Hour
  • Time required to charge your lithium battery

Charging Capacity of the Battery Management System

How to Charge RV Batteries: The Basics

Once you’ve decided what method to use for charging RV batteries, these general guidelines will ensure they stay in great shape.

  • Make sure you keep your batteries clean, now matter what type they are. Water, oil, and dirt may cause self-discharge and short circuits.
  • Install your battery charger in a clean, accessible spot.
  • When you want to charge your RV battery, park your RV in a level spot and put on the parking brake.
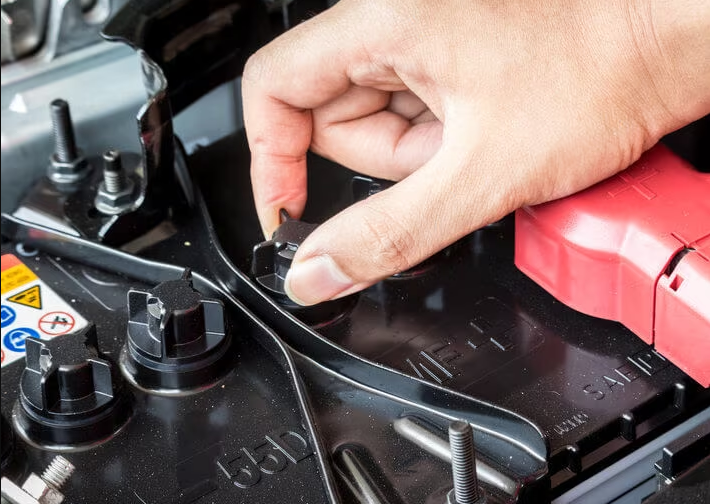
  • Take the cables off of the battery leads. (Negative first, then positive).
  • Clean sulfation and add distilled water if necessary (lead acid batteries only).
  • Attach the battery charger cables to the battery (or converter cables). (Positive first, then negative).
  • Plug the charger or converter into your power source.
  • If you have a smart lithium battery charger, you can view the charging status on your phone via Bluetooth. A light on the charger will indicate when the battery has finished charging.
  • Turn off the power source and disconnect the battery.

If you’re using a generator or solar panels, be sure to read any product-specific instructions before charging your batteries.

RV Battery Charging Safety Tips

Anytime you deal with batteries, safety questions are bound to pop up. Wondering at what temperatures you can charge RV batteries safely? Afraid that you might “fry” your batteries by overcharging them, or damage them by undercharging them? Those are valid questions. Now here are some straightforward answers:

  • Beware of battery sulfation with lead acid batteries. Clean any buildup before charging and keep your batteries in a vented place. (This problem doesn’t apply to lithium batteries, because they’re 100% maintenance free).
  • If you are using a battery charger, choose one that’s compatible with your battery type (lithium, lead acid, AGM), voltage, and amperage.
  • Use a charge controller when charging your RV batteries with solar panels. If you don’t, the current coming from your panels will have free reign to overcharge your batteries when the sunshine is strong.
  • Disconnect your batteries when your RV is in storage. Or, extend the life of your lead acid batteries by using a trickle charger. Many RVers do this in winter. It’s not necessary for lithium batteries, since they discharge very little while not in use.
  • Never charge a frozen battery. You can use Ionic lithium RV batteries below freezing. But charging below freezing causes plating/crystallization. This weakens the battery, making it more likely to fail due to vibration or hard use. Fortunately, our Ionic lithium batteries have a sophisticated BMS (battery management system) so they’ll only accept a charge when the temperature is safe to.
  • Don’t charge at temperatures above 122°F (50°C).

Frequently Asked Questions

Q: Can I charge my RV battery while it’s still connected to the RV?

A: Yes, you can charge your RV battery while it’s connected to the RV. However, ensure that all appliances and electrical systems are turned off during the charging process to avoid any potential safety hazards.

Q: What’s the best method to charge my RV battery?

A: The most common and effective methods for charging RV batteries are using a shore power connection, a generator, or solar panels. Each method has its benefits and limitations, so choose the one that suits your needs and camping style.

Q: How often should I charge my RV battery?

A: The frequency of charging your RV battery depends on how often you use it and the type of battery you have. As a general rule, it’s recommended to charge your battery once it reaches a 50% state of charge to extend its lifespan and prevent deep discharge.

Q: Can I overcharge my RV battery?

A: Yes, overcharging can damage your RV battery. To prevent overcharging, consider using a smart charger or a converter with a built-in charging controller. These devices will automatically adjust the charging rate and prevent overcharging.

Q: Is it safe to charge my RV battery indoors?

A: Charging your RV battery indoors is generally safe, but it’s essential to follow safety guidelines. Ensure proper ventilation to dissipate any gases that may be produced during charging, and avoid charging the battery near flammable materials.

Q: How long does it take to charge an RV battery fully?

A: The charging time depends on the battery’s capacity and the charging method used. On average, it can take anywhere from a few hours to a full day to charge an RV battery fully.

Q: Can I use a regular car battery charger for my RV battery?

A: Using a regular car battery charger for your RV battery is not recommended. RV batteries often have different charging requirements, and using the wrong charger can damage the battery or pose safety risks. It’s best to use a charger specifically designed for RV batteries.

Q: Should I disconnect my RV battery when not in use?

A: If you plan to store your RV for an extended period, it’s a good idea to disconnect the battery to prevent parasitic drain. This will help maintain the battery’s charge and prolong its lifespan.

Q: Can I jump-start my RV battery from another vehicle?

A: Yes, you can jump-start your RV battery using another vehicle, but be cautious. Ensure both vehicles are turned off during the connection process, and follow proper jump-starting procedures to avoid electrical damage or injury.

Q: What maintenance should I perform on my RV battery?

A: Regularly inspect the battery for signs of corrosion, clean the terminals, and check the electrolyte levels for flooded lead-acid batteries. For sealed batteries, check for any visible damage or leaks. Additionally, keep the battery charged and store it in a cool, dry place when not in use.

In the modern fishing boat, regardless of whether it is piloted by a casual weekend angler or a seasoned tournament professional, electrical power from one or more on-board batteries is relied upon for nearly all essential features and functions.

Deep cycle batteries are distinct power sources designed specifically for marine applications. Their unique feature is the ability to be discharged almost completely and then recharged back to a like-new state. Charging a battery involves intricate science, and understanding how to safely perform this task is of utmost importance. By learning some expert tips, you can prolong the lifespan of your battery pack and get the most out of its performance.

5 Steps for Charging a Deep Cycle Marine Battery

Most boats are equipped with deep-cycle batteries designed to provide sustained power for long periods. And unlike other battery types, you can drain and recharge a deep-cycle marine battery time and time again.

Want to give it a go? In this post, we’ll explain how to charge a boat battery in these five simple steps:

1. Choose the Right Charger

Because there’s a wide variety of boat batteries on the market, you’ll find an abundance of battery chargers to choose from. And as you can probably imagine, the best charger for your deep-cycle marine battery will be designed specifically for it. We recommend matching your charger to your boat battery’s chemistry and voltage, and if you have more than one battery on board, make sure the charger can accommodate both.

All boat battery charges fall into one of two categories: onboard and portable.

As their name suggests, portable chargers are known for their portability and can be used anytime and anywhere. Additionally, they’re less expensive. On the other hand, onboard chargers are already connected to the battery system, which makes them easier to use. All you have to do is hook them up to a standard 120-volt outlet, and they’ll charge relatively quickly.

2. Select the Right Time

Did you know that charging a boat battery requires certain conditions? The optimal charging temperature for ionic lithium batteries is above freezing. However, you can get away with charging them at temperatures of -4°F to -131°F without causing damage.

3. Clean the Battery Terminals

This step is pretty self-explanatory. Grimy battery terminals disrupt the charging process (making it longer and less efficient). Therefore, you’ll want to clean them before you begin!

4. Connect the Battery Charger

The next step to charging a boat battery is connecting the charger. To do so:

  • Connect the red (positive) cable to the red terminal.
  • Connect the black (negative) cable to the black terminal.
  • Plug in the charger and turn it on.

If you’re using a smart charger, you can set it up and forget it. These chargers are designed to stop charging on their own. In addition, most ionic lithium chargers have Bluetooth capabilities, so monitoring their progress is easy. However, if you’re using a lead-acid charger, you’ll have to set a timer and manually disconnect it once it’s finished.

5. Disconnect the Charger

Once the battery is fully charged, you can disconnect the charger by unplugging it. Then, remove the black cable from its terminal, followed by the red one.

How to Install a Deep Cycle Battery?

In case that you are looking forward to upgrading to a deep cycle battery for your vehicle, then you should first learn more about its installation instead of maintenance details. Thankfully, installing a deep cycle battery is quite easy and very similar to most other battery types. You can simply follow the given steps for installing a deep cycle battery in your vehicle

  • First, make sure that all of the electronics as well as the ignition of your vehicle is turned off before you remove your existing battery.
  • Then, check the positive and negative terminals of your existing battery and ensure that they are the same as the upgraded deep cycle battery you are installing.
  • Now, use a spanner to first loosen the negative terminal and then the positive terminal while pushing the terminals away from the battery.
  • At last, remove the hold-down clamp of your battery to safely remove the battery using the inbuilt handle.

Once you have removed the battery from your vehicle, you can proceed ahead to install the new deep cycle battery as shown here:

  • Before installing the battery, make sure the battery tray is properly cleaned with water and baking soda before installing the new battery.
  • Now, place your new deep cycle battery in the battery tray while making sure that it fits properly.
  • Then, install the hold-down clamp for your battery in a way that the battery is properly secured.
  • At last, connect the positive terminal and then the negative terminal while ensuring that they are pushed all the way down. You can also consider installing the rubber caps for the battery terminals if your deep cycle battery comes included with the same.

How to Charge a Deep Cycle Battery?

After you have successfully installed a deep cycle battery in your vehicle, you can go ahead and start using it for all its various benefits. Although, if you are using a completely new deep cycle battery, then it is highly likely that it did not come charged out of the box.

In other words, before you can use your deep cycle battery, you will have to charge it. For the same, you need to keep a few things in mind before charging a deep cycle battery which includes the following:

  • To charge a deep cycle battery, you will have to use a multi-stage battery charger that is compatible with your deep cycle battery. These battery chargers charge your batteries in a total of 3 stages which include constant current, constant voltage, and float charge.
  • To choose the right multi-stage battery charger for your deep cycle battery, you will have to first ensure that the voltage of your charger matches the voltage of your battery which is generally either 6 volt or 12 volt.
  • Now, divide the Ah rating of your battery by 10 to calculate its ideal charger amp rating. While keeping a battery charger for your deep cycle battery, you have to make sure that its ideal charger amp rating is as close as possible to that of your battery.
  • Once you have decided upon the right multi-stage battery charger for your deep cycle battery, you have to ensure that you are using it safely as well. And it goes without saying that, you have to keep your battery and charger away from all flames and sparks.
  • You should ensure that the charger is turned off whenever you are connecting or disconnecting batteries to it.
  • When you are charging batteries, both the batteries and the charger need to be properly vented to prevent overheating.

Why Do You Need To Charge Your Battery Correctly?

Why does it matter how you charge your deep cycle battery? Well, charging your battery the right way can have an effect on how well and how long it lasts.

For lead acid batteries, overcharging can ruin them. Leaving them at a partial state of charge can do a real number on them too.

Luckily, those no-nos don’t exist for lithium marine batteries. You can use them past 50% battery capacity without damaging them. And you don’t have to charge them right away after using up your charge. This is super convenient when coming home from a fun but exhausting day out on the lake.

Cycles of Battery Charging

During its lifetime, you can recharge a deep cycle battery to full capacity many times. You can drain it down a long way and then recharge it to full capacity many times. You’d typically start with the battery at 100% capacity, then drain it down to between 20% and 50% of its capacity. And then recharge back up to 100%. No problem.

The normal depth of discharge of your batteries will also affect their lifespan. To make a battery last longer, you need to push it to 50% of its capacity, and often. Repeated shallow discharge (5-10%) of a deep cycle battery reduces its lifespan.

A good deep cycle battery can be drained and then recharged to full capacity. You don’t have to be very conservative with your batteries when you’re on the water.

Choose the right charger voltage/amps.

Once you know what type of charger you need, you need to pick one with the right amount of voltage and amps. For example, a 12V charger is compatible with a 12V battery. Within the 12V Lithium Battery category, you can choose from different charge currents (i.e. 4A, 10A, 20A).

To choose the right amount of amps, check the amp hour (Ah) rating of your battery. Make sure the amp rating isn’t higher than the amp hour rating of your battery. Using a charger with an amp rating that is too high can damage your battery.

Charge in the right conditions.

Did you know that high and low temperatures can affect your marine battery? Lithium batteries are the most resilient of the bunch. You can charge them at temperatures between -4°F – 131°F (0°C – 55°C) with no risk of damage. But the optimum charging temperature for Ionic Lithium Batteries is above freezing. If you need to charge your battery below freezing temps, no need to fret. Our 12V 300Ah battery is a beast of a battery. It comes equipped with a heater, so no more worries about freezing temperatures!

Deep Cycle Battery Maintenance

Once you have installed your deep cycle battery in your vehicle and properly charged it, you would want it to stay functional for as long as possible. In other words, it is highly important to properly maintain your deep cycle battery for long-term usage. For the same, you can keep the following things in mind:

  • Whenever you are charging your deep cycle battery, make sure to set the charging voltage properly for proper long-term usage.
  • If you are using lead-acid batteries, then you need to refill them every 2-4 weeks with distilled water for optimum performance.
  • You should regularly clean the terminal connections of your deep cycle battery to prevent any corrosion or other issues.

Battery Health and Safety

While we have already discussed some of the crucial deep cycle battery maintenance tips up above, you also need to ensure complete safe usage at all times. Therefore, you should also keep the following deep cycle battery health and safety tops in your mind at all times:

Battery Acid

If you are opening up a battery for maintenance, then you have to be extra careful with the battery acid present inside. If it comes in contact with your skin, it can cause severe burns and other problems.

First Aid

In case of any form of accident, you should flush your eyes continuously while holding your eyelids apart. You need to continue this for 15 minutes to prevent any eye damage. Similarly, you should also wash your skin with running water in case of an accident.

Acid Spill Response

If battery acid has been spilled due to some accident, you need to neutralize with soda ash or some different alkali. Once neutralized, everything should be properly disposed of as chemical waste.

Exploding Battery

In some cases, a deep cycle battery may generate explosive gases over time as it gets used. And if there are any kind of flames or spark around the battery, it may cause an explosion due to these batteries.

Eye Protection

Whenever you are changing batteries, installing batteries, or doing anything else, you have to be sure that you are wearing proper eye protection at all times.

Avoiding Extreme Circumstances

As you get set to charge your deep-cycle battery, remember that extreme temperatures aren’t ideal for the components. Keep the battery and charger away from extreme heat or cold. The charging process is dependent upon a certain range of temperatures. Room temperature is optimal. The storing process can operate without any strain. You may notice charging times changing when it’s too hot or cold. The battery is also permanently affected with a shorter charge time than before.

Frequently Asked Questions

How Long Does It Take to Charge a Boat Battery?

If you want your boat battery to charge as fast as possible, use a charger designed specifically for it. From there, expect a marine battery to charge from 0% to 80% for about four to six hours.

Can You Charge a Boat Battery on the Water?

You sure can! Portable charges are ideal for charging your boat’s battery while it’s afloat.

How Long Do Boat Batteries Hold Their Charge?

How long your battery holds its charge depends on various factors, including the make/model of the battery and the type of battery. As you can guess, the more frequently you use the battery, the more you need to charge it. But in general, expect your marine battery to hold its charge for about six months.

What Are the Maintenance Costs?

How much a marine battery charger costs depends on its size and power requirements. However, average costs range from $100 to $500. Boat batteries last three to four years (although they can last up to six years under the right conditions). Then, the replacement battery cost will fall between $100 and $500.

Do you need a special charger for a deep cycle marine battery?

Marine lithium batteries come in 4 different chemistries: flooded, AGM (Absorbed Glass Mat), gel and lithium. If your starting and deep cycle batteries have different chemistries, you will need to pick up a different charger for each battery, or find a charger with a charging setting for both chemistry types.

What kind of battery charger do I need for a deep cycle battery?

Your deep cycle battery charger should match your battery’s voltage. This part’s easy — but extremely important. Choose a battery charger that matches the voltage rating of your battery. For example, if your battery is rated 12 volts, you need a 12V battery charger.

The most dreaded scenario for any vehicle owner is encountering a dead battery. When your automobile’s battery is dead, it often prevents the car from starting. Vehicle batteries play a crucial role in providing the necessary power to start the engine. As you drive, the battery gets recharged by the alternator. However, many people are unaware of the time it takes to recharge a battery.

While driving, the car’s battery usually recharges itself automatically. But the question remains: how long does it take to charge a car battery? Typically, charging a car battery takes four to eight hours at highway speeds. However, even while driving, it may not reach a full 100% charge.

A flat battery is one of the most common reasons why cars fail to start. So, how can you maintain it in excellent condition? And if it does let you down, how long will it take to recharge the car battery? Additionally, what is the best method for recharging it, and what are the warning signs that indicate your battery is approaching the end of its life?

What causes a battery to go flat?

A flat battery can be caused by a number of things, such as lights being left on, something in the electrical system causing a battery drain, or even a faulty battery that won’t hold its charge. Corrosion and cold weather and general wear and tear can also cause your battery to fail meaning it could be time to buy a new one, or inject new life into the old one.

How long does it actually take to charge a car battery?

A typical automotive battery may be fully charged in 2 to 4 hours using a 20 Amp charger, and in 12 to 24 hours with a 4 Amp charger. Another vehicle can be used to jumpstart the battery in your car. Idling is another method for charging the battery if you can get it started.

The actual charging time for a car battery is between 10 and 24 hours. These are fast, efficient chargers. If you’re utilizing a trickle charger, your battery may need to be charged for three or more days. Slow charging protects the battery. A car battery has 48 amps; therefore, divide 48 by the charging rate to get the number of hours it will take, depending on how many amps your charger has.

For instance, if your charger charges at 6 amps per hour, charging a battery to 100% charge will take 8 hours. However, let’s examine if your battery is worth rescuing before you connect a charger. First, since batteries typically last 4 years, if your battery is older than 3 years it might be worth replacing. But keep in mind that a fully dead battery may be permanently ruined and may leave you stranded once more.

How to recharge your car battery

Make sure you’re outdoors or in a well-ventilated area. Take off any jewelry, put on gloves and put on safety glasses.

  • Plug in your charger. Consult any specific instructions for your charger.
  • Connect a backup battery to the On-board Diagnostics II (OBD-II) port. Your car’s onboard computers need power all the time. Losing power wipes their memory, and that can cause real car problems, including erratic idling behavior.
  • Disconnect the car’s negative (usually black) terminal. Then put a rag or a glove around the terminal to prevent it from touching anything else. Disconnecting the negative will protect your car’s electronics from the charging voltage.
  • Connect the charger to your car battery terminals. Your charger’s clamps should match the posts. Be careful not to touch your charger’s terminals to the negative terminal you just disconnected.
  • Set the voltage to 12 volts and choose “flooded” or “wet” for the battery type. Flooded and wet are car industry terms for a regular car battery, as opposed to an AGM battery, enhanced flooded battery or a lithium battery. If you’re using a smart charger, it may detect the voltage and battery type for you.
  • Start the charger and wait. Depending on your battery charger, it may take 4-8 hours to charge your battery enough to start the car a few times. It may take 10-24 hours to charge your battery up to 100 percent. The longer you charge it, the more strength the charger can put in the car battery.
  • Disconnect the charger from the battery when it’s done. Your charger’s indicator light will signal when it’s done charging the battery. Again, avoid letting the charger’s clamps touch the battery’s loose negative clamp.
  • Reconnect the car’s negative terminal to the battery. Disconnect the backup battery. Now you’re ready to hit the road with a fresh start.

Charging your car battery will warm it up. If it gets too hot, the water inside the battery evaporates. In turn, the liquid inside gets more acidic. That means the battery’s insides corrode much faster. The solution is to charge your battery slowly. You want to raise its charge without raising its temperature.

Recharging your battery can add months to its lifespan. It also strengthens the battery so it can better serve your whole engine. The car battery does more than start your engine. It protects your onboard electronics from the engine’s stray power spikes. It also backfills your alternator if your engine or electronics need more power than the alternator can give at any moment.

What types of battery charger should you use?

Use an automatic battery charger that adjusts its charging voltage for the fastest charge.

Chargers vary significantly, even within their types. From trickle chargers to smart chargers and maintainers, the biggest difference between battery chargers comes down to how long do you plan to charge the battery:

  • Use a smart or automatic charger for 10-24 hours. It depends on how weak the battery is and which amp settings your specific charger uses. Your car battery will be 100 percent charged when it’s done.
  • Use a trickle charger for several days to a week. The most common charger type, trickle chargers, use far fewer amps but can push enough power into the battery to charge it slowly. Some trickle chargers are solar powered. Others plug into a wall. They all provide a steady trickle of power.
  • Use a battery maintainer for months. These don’t charge batteries. If you charge a battery to 75 percent and then hook it up to a maintainer in the fall, it’ll still be 75 percent next spring.

Another device you might find sold beside a battery charger is a jump-starter.However, jump-starters do not charge your car battery. They only send power (through your car battery) to the starter so you can get going again.

How a car battery charger works (and why it takes so long)

Charging a battery is like blowing air into a balloon.

At first, you can push a lot of air into the balloon without much effort. Then you have to blow harder as it fills up. When it’s almost full, you’ve got to blow as hard as ever. At that point, you’re working just as hard to keep air in the balloon instead of blowing back into your face.

Car battery chargers go through three phases as they charge a car battery:

  • The bulk phase. The charger raises the battery up to 75 percent in a few hours because it doesn’t have to raise its voltage much to fill it with amps. The charger takes this process slow to keep the battery from getting too warm. By the way, a car battery at 75 percent is not going to reliably start your car for long.
  • The absorption phase. Now the charger must raise its voltage to push the last 25 percent into the battery. As it charges up, the battery’s voltage returns to a normal 12 volts. The charger needs more voltage to finish pushing power into the battery. Higher voltage can heat up the battery, so the charger goes slow. It may take hours to absorb its new power.
  • The float phase. This phase keeps the battery’s voltage up until you’re ready to take it off the charger. Now your battery is up to 100 percent, so the charger turns into a trickle charger. After all, an idle battery slowly loses its charge.

What are the signs and symptoms that your car battery needs charging or replacing?

Here are the most common signs and symptoms that it’s time to charge or replace a car battery:

  • Your car has trouble starting.
  • The vehicle’s start-stop system malfunctions.
  • You have a battery that is over five years old.
  • The car’s electrical system is losing power.
  • Your dashboard’s battery warning light illuminates.

Your car has trouble starting

We’ve all undoubtedly felt that sinking feeling while trying to start our vehicle and it splutters and growls back at you at some point or another. Your battery needs to be charged if your automobile won’t start with a single turn of the key (or push of a button). Investing in a battery charge, such as those in the new CTEK line, is a far easier method to deal with the issue than continuing to try to start the engine and then, if you are successful, setting out on a journey of at least 30 minutes to give your battery enough time to charge (more on that below).

The vehicle’s start-stop system malfunctions

Your battery can be monitored by start-stop systems, which can also measure the amount of electricity being extracted from it. In order to prevent the battery from being so severely discharged that your car won’t actually start, the system may disable the start-stop function if it detects that your battery is having trouble. Once more, the winter months present more of a problem because your battery is under additional stress from your heater, lights, and wipers. And once more, a battery charger can be used to solve this problem. Make sure to pick a type of charger, like a smart charger, that works with start-stop batteries.

You have a battery that is over five years old

Although most automobile batteries are made to last between five and seven years, a battery that is having trouble may simply be an indication that it is nearing the end of its useful life. The date that the battery was made, which is stamped on the battery, can be used to determine how old it is.

The car’s electrical system is losing power

It’s likely time to charge your battery if your windows, lights, heater, or other electric devices respond slowly or suddenly lose power. This kind of issue is more likely to be present during the colder months when you use more of your car’s electrical systems, such as the lights and heater, and your battery has to work more to keep everything running. Once more, this is a circumstance in which a battery charger would be really helpful.

Your dashboard’s battery warning light illuminates

If your dashboard displays that annoying battery icon, it indicates your alternator, battery, or electrical system may be malfunctioning. All of this indicates that your car won’t be effectively charging itself while you’re driving, and you’ll likely experience a flat battery at some point in the future. In either case, you should have your car checked by a professional.

How much does it cost to charge a car battery?

Your battery can cost between $10 and $20 to be charged at an auto repair shop. But, if the battery is damaged, you’ll need to buy a new one to swap out the damaged one. Standard lead acid batteries are easier to install and take less time, therefore a repair shop may charge $5 to $10 to do so.

FAQs

How long does it take to charge a completely dead car battery?

It will take roughly 10–24 hours to fully charge a standard automotive battery with a usual charge amp of 4–8 amperes. It would take about 2-4 hours to sufficiently charge your battery so that you could start the engine. Recharging slowly is the best strategy to ensure that your car battery lasts a long time.

How do you know when a car battery is fully charged?

You’ll need a voltmeter to check the voltage; they are reasonably priced and available at most of the major auto parts retailers. Use the voltmeter to measure the battery voltage to assist you to decide what to do next. Your battery is healthy and fully charged if it is 12.6 volts or above. No other action is required.

Does idling a car charge the battery?

Yes, your car’s battery will begin to charge as long as the engine is running, to answer your question simply.

Will a car battery recharge itself overnight?

No. There is no way for a dead automobile battery to recharge. You might take it outside to charge it or jumpstart it using a different battery or another vehicle. There isn’t a car battery out there that can charge by itself without help.

Can a dead car battery still be charged?

There are ways to fully recharge your battery if it is entirely dead but has been given a jump start. As was already explained, the first is by driving around. But, automotive battery chargers can regenerate the entire charge into a battery if that doesn’t seem to be working.

How many times can a car battery be recharged?

Depending on driving and weather conditions, most car batteries have a lifespan of three to five years or between 500 and 1,000 charging cycles. Your car battery won’t last forever, but you can make it last as long as possible by taking good care of it.

How far do you have to drive to charge a battery?

Driving for at least 30 minutes at highway speeds is required to acquire a full charge from a trip. 30 to 40 miles approximately. To gain power, you can also let your automobile idle, but it will take much longer.

How long should I let my car run after a jump?

After you jump-start the automobile, it’s advisable to drive it about or let it idle for at least 30 minutes. For the alternator to properly charge the battery, you should ideally drive the automobile for 30 minutes.

What can drain a car battery when the car is off?

When a car is not in use, factors like interior lights, door lights, or even faulty relays can deplete the battery. You usually don’t have to worry about the battery dying while you’re playing the radio on your commute to work because the alternator recharges it while your engine is running.

What should you not do after you jumpstart a car?

Your automobile won’t charge as rapidly if you leave it idling. Your car should restart within 30 minutes, and each subsequent drive will keep it charged.

How long to charge a battery at 2 amps?

It takes 24 hours to fully charge a 48 amp battery at 2 amps. A battery has around 48 amps, so divide 48 by 2 and you arrive at 24 hours.

How long to charge a battery at 6 amps?

To fully charge a battery at 6 amps it takes 8 hours.

How long to charge a battery at 8 amps?

To fully charge a battery at 8 amps it takes 6 hours.

How long to charge a battery at 10 amps?

To fully charge a battery at 10 amps it takes almost 5 hours.

How long to charge a battery at 20 amps?

Before you charge a car battery at 20 amps, if it’s dead this can potentially damage the battery. But to fully charge a battery at 20 amps it takes 2 and a half hours.

How long does it take to charge a battery at 50 amps?

Before you charge a car battery at 50 amps, if it’s dead this can potentially damage the battery. But to fully charge a battery at 50 amps it takes 1 hour.

How much charge does a car battery need to start

12.4 volts

A fully charged car battery should have a voltage of around 12.6 volts. When the battery voltage drops below 12 volts, there is a possibility that it won’t have enough power to start the car. It is recommended to have a battery with a voltage of at least 12.4 volts to ensure a reliable start.